Wednesday, December 21, 2005

How big is one pixel?


The truth is that a pixel, or picture element, has no fixed size. A pixel has value - this blue, this bright; and position - this many down, this many over; but not size.

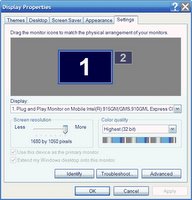
Video devices, such as your monitor, display pixels of variable sizes. Take a look at how your monitor is set: Right click on an empty are of the desktop. Click on the settings tab, and look for the "screen resolution" slider. Within limits, you can set the monitor (really the video card) to display more or fewer pixels. Of course no matter how you set this, your physical monitor remains the same number of inches. Because your monitor is physically a fixed size but the number of pixels it displays can change, the number of pixels per inch is variable, as is the size of those pixels. The term "DPI" or dots per inch is frequently used when pixels per inch is really more appropriate.

But aren't all monitors 72 dpi?

No. Go back and read this again. Get out your ruler and measure the number of inches wide your monitor's image is. Then divide that into the number of pixels the display settings shows. In my case, it's 96 and change. And that's a consequence of the math, not anything the driver is doing. If you hook up a smaller monitor, your ppi goes up. With a larger monitor the pixels are spread across a physically larger space and the number per inch is consequently smaller. Or just forget about it. What's important when it comes to monitors is the number of pixels displayed, not how many inches of screen they're spread across.

The whole 72 dpi thing probably stems from the early days of the Apple Macintosh, when you could have any size screen you wanted as long as it was the exact single size (and resolution) Steve Jobs said you could have. 100 years later, Henry Ford is smiling.
Resolution For The Web


Recently, I was reading some Photoshop material written by an instructor I respect. Before I got two far, I had picked up a number of nice tips. Then it happened. The evil myth of 72 dpi. The instructions for sizing an image for the web or email make several references to setting the resolution to 72 dpi. It also mentions that if the "image size" is set to inches instead of pixels to set the inches to the desired size and set the resolution. This is soooo wrong.
Simply put, video devices don't understand inches, and the "I" in DPI is "inches". Let me say it again: Your monitor, video card, LCD projector, TV, etc do not understand the concept of inches.

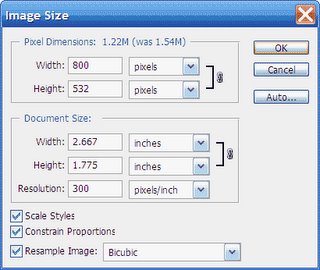
So what is correct? The right thing to do is to ignore the "document size" part of the Photoshop image size dialog. Let's take a look at it. Access the dialog from the Image > Image Size menu. The dialog is divided into three areas: The pixel dimensions, the document size, and some options at the bottom. The most interesting part to us is the "Pixel Dimensions" part. Your screen is set to a display a particular number of pixels. Some common sizes are 800x600 pixels and 1024x768 pixels.

When I email someone an image I want them to just look at on the screen, or display on a video projector, I have to keep those dimensions in mind. If the resolution of the screen (or projector) is 1024x768, then that's the most it can display. Sending an image exactly that size will exactly fill the screen. Making the image larger will result in one of two things: The display software will resize the image to fit, or you will only be able to see part of the image. Either way, sending an image bigger than what the display device can display is simply a waste of bandwidth. It won't make it "better", and in fact might make it display worse. Photoshop is better at resizing images than most software, so that's where you want your resizing to happen.

For a web page, or if I don't want to fill the user's display, I'll frequently make the image even smaller than the display's maximum.

Let's say I want to size an image to no larger than 800 pixels on the longest side for display on my friend's screen. Here's how you do it:
  1. Open the image in Photoshop.
  2. Bring up the image size dialog with the Image > Image Size menu.
  3. Make sure the "constrain proportions" box is checked at the bottom of the dialog. If not, your image will be distorted.
  4. Make sure the pixel dimension section of the dialog is set to "pixels" not "percent".
  5. If the image has a horizontal orientation, set the width to 800 and let the height change automatically. If the image is vertical, set the height and let the width change.
  6. Make sure the "Resample Image" box is checked.
  7. Ignore the "Document Settings" "Resolution" box!
  8. Click OK.
When you do this Photoshop will correctly resize the image. Save it however you like. I nearly always use "File > Save For Web".

If you don't believe that resolution doesn't change anything, try this experiment:
  1. Resize the image as described above.
  2. Double-click the zoom tool to make the image display in Photoshop at 100%.
  3. Reopen the image size dialog.
  4. Uncheck "Resample Image".
  5. Change the "Document Settings" "Resolution" to 5 (yes five) pixels / inch.
  6. Click OK.
  7. Notice your image is still displayed at 100% and is still the same size.
  8. Reopen the Image Size dialog.
  9. Verify "Resample Image" is still unchecked.
  10. Change the "Document Settings" "Resolution" to 5000 (yes five thousand) pixels / inch.
  11. Click OK.
  12. Notice your image is still displayed at 100% and is still the same size.
The Document Settings > Resolution box is sets a tag in the image file to tell print devices how big to make the pixels. All video devices ignore it. When preparing files for video, web, and email, you should too.

Friday, December 02, 2005

What is the best method to backup images?

Q: WHAT IS THE BEST METHOD TO BACK UP YOUR IMAGES FOR QUALITY AND VOLUME? I HAVE HEARD A CD, STICK, OR EXTERNAL HARD DRIVE FROM DIFFERENT PEOPLE.

A: CD or DVD, two copies stored in different places. And don't shout.

You face these perils:
1) Electronic disaster (the drive gets corrupted or the smoke leaks out)
2) Physical disaster (the house burns down, the basement leaks)
3) Accidental deletion (OOPS!)

Another issue is file format obsolescence. Will the Photoshop of 10 years from now be able to read today's camera raw format (or PSD)? For this reason, some people recommend storing TIFF files instead of PSD or raw files for both the master and original image sets.

CD/DVD is a good option for all of these because it's cheap, durable, relatively permanent, and easy to make redundant copies. It's particularly good for archiving. The biggest downside is that people don't bother to make the disk. Also, they do tend to proliferate.

An external drive is no more safe than your internal drive. If the external drive *duplicates* your internal drive, then you have redundancy and are protected against 1 and to a degree 3.
It's common though to have a small drive in your laptop and a big external drive. Things get moved to the external drive to free up space, then it's on one drive. This leaves you subject to hard drive failure, etc.

Memory sticks are very expensive. $50 - $100 /gig, whereas CD/DVD is about $0.50 per gig or less.

Burn things to CD. Make an extra copy. Take the copy to the office.

Here's what I recommend:
1) Burn the original jpg or raw files (whatever you shoot) to CD-R or DVD-R as soon as they come out of the camera. Label it "Originals"
2) Do whatever manipulation you're going to do. When you're done working with a set, burn the manipulated images to another disk. Label it "Masters"
3) If you're working on a set over a long period of time, make a copy on DVD-RW or CD-RW as an interim step between 1 and 2. You can continue using this disk for different sets of images. It's your working backup.
4) If you'd really be unhappy if you lost the images, make a copy of the 1 & 2 disks and store them somewhere else.
5) About every 10 years, consider editing your collection and copying it to the latest media.