
“Cheating?”
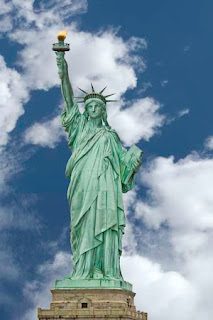
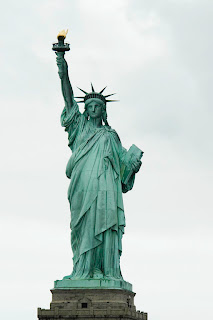
Yep. Get over it. Most of us can’t drop everything and get the perfect shot on the perfect day, or stay in New York until the sky is great over the Statue of Liberty.
Of course if you’re going to replace bad sky with a good one, you need to have a good sky handy. It’s tempting to bag a sky when it’s a dramatic sunset, and you should, but you should also have a collection of nice noon skies as well.
When you see a nice sky, shoot it both horizontally and vertically. Also use various focal lengths so you will have a pattern that matches the scene you’re trying to fix.
Start by opening both images in Photoshop. Adjust the image with the bad sky (the “main” image) for color, contrast, and density, and then flatten the image. The point here is to create a starting point where both images are compatible.
Select the sky with the magic wand tool.
Make sure “Contiguous” is unchecked. Even in this relatively simple example, there are numerous areas where the statue creates isolated areas of sky. We want them all to be selected.
Click with the wand out in the sky area. If the wand does not select the entire sky, there are a couple of things you can do to fix it. One is to deselect (ctrl-D), increase the tolerance, and try again. Another is to hold the shift key down and click with the wand again in the unselected area. The shift key puts the selection in “add” mode. A little plus sign will appear next to the tool.
The magic wand tool selects based on brightness. It adds and subtracts the value in the tolerance box to the value of the pixel where you click and selects all other pixels within that range. It does this for each channel. For example, let’s say a pixel of my sky is R229, G227, B222 (a slightly warm bright gray) and my magic wand tolerance is 15. The tool will select all pixels with a value in the range R(244-214) G(242-212) B(237-207)
The magic wand tool is just one way to select an area. They key is to get the sky selected, not how it’s selected.
Switch to the sky image. Press ctrl-a to select everything, then ctrl-c to copy.
Next switch back to the main image and make sure your ants are still on the march. Paste the sky into the selection with Edit -> Paste Into (shift-ctrl-v).
You will get a new layer and a mask.
You can position the sky by using the move tool (V). You can also stretch, shrink, or otherwise change the sky by transforming it. Press ctrl-t and drag the handles around to transform the sky. Skies can take an amazing amount of manipulation and still look good.
You may or may not get a halo around the edge. In the image above, the original is on the right; the image with the replaced sky is on the left. There are a couple of things to notice here. First the halo on the left is caused by the selection not being perfect, and the mask isn’t 100% right up to the statue edge. That’s allowing a pixel or so of the original sky to bleed through. (This shot is with both images enlarged to 1600%.) The other thing to notice is that no edge is always perfectly crisp at this level of zoom. Natural edges transition over 3 or 4 pixels.
If you have a halo, you need to fix it. Essentially what you have to do is refine the mask Photoshop created for you using the same techniques you always use to deal with the mask. What we’ll do is make the mask slightly smaller, allowing less of the background image to show through.
Zoom way in, use a very small brush and paint white on the mask along the edge.
You may be able to avoid the problem by expanding your initial selection. After you click with the magic wand, use the menu to select Select -> Modify -> Expand and add one pixel to the selection.
Note that this isn’t always best. You may have some cleanup to do around the edges in the other direction. In this case, the edge of the torch is too sharp, and I need to use black on the mask with moderate opacity to smooth it out.
The best sky to replace isn’t a white sky, it’s a blue sky. Notice that when the edge selection isn’t quite right the halo comes not where there replacement has a cloud, but where blue is getting substituted on top of the original white. That original white shows up as a halo in the replacement blue sky. Where there is a nice white puffy cloud in the replacement sky, the white halo is still there but you can’t see it because it’s white on white and it looks natural. That means the best replacement of a totally white flat cloud sky is one with some blue but also a lot of clouds. It also means positioning the replacement sky clouds under your fine detail means less cleanup than positioning the blue replacement there.
If you’ve ever wondered what a tool or option does in Photoshop you’ve probably discovered that the Photoshop help file is totally useless. What the help system should have told you is in the Photoshop 6 Shop Manual by Donnie O’Quinn (ISBN 0-7357-1130-5). Alas it hasn’t been updated for later versions of Photoshop. Still, most of the tools you use and most of the options are unchanged from this version. For example, if you want to know how each blending mode works, or exactly what each option for the magic wand does, this book will tell you. It’s available used on Amazon from $9.49 to $39.99. There are 13 reviews, 12 five star, and 1 one star. The one star guy wasn’t arguing about the content, but bitching about the binding. I’d take it if it was loose sheets. As one reviewer said, Breathtakingly useful... an indispensable resource. There is really nothing else like it.
Yep. Get over it. Most of us can’t drop everything and get the perfect shot on the perfect day, or stay in New York until the sky is great over the Statue of Liberty.
Keeping a sky library
Of course if you’re going to replace bad sky with a good one, you need to have a good sky handy. It’s tempting to bag a sky when it’s a dramatic sunset, and you should, but you should also have a collection of nice noon skies as well.
When you see a nice sky, shoot it both horizontally and vertically. Also use various focal lengths so you will have a pattern that matches the scene you’re trying to fix.
Bringing the two together
Start by opening both images in Photoshop. Adjust the image with the bad sky (the “main” image) for color, contrast, and density, and then flatten the image. The point here is to create a starting point where both images are compatible.
Select the sky with the magic wand tool.
Make sure “Contiguous” is unchecked. Even in this relatively simple example, there are numerous areas where the statue creates isolated areas of sky. We want them all to be selected.
Click with the wand out in the sky area. If the wand does not select the entire sky, there are a couple of things you can do to fix it. One is to deselect (ctrl-D), increase the tolerance, and try again. Another is to hold the shift key down and click with the wand again in the unselected area. The shift key puts the selection in “add” mode. A little plus sign will appear next to the tool.
How it works
The magic wand tool selects based on brightness. It adds and subtracts the value in the tolerance box to the value of the pixel where you click and selects all other pixels within that range. It does this for each channel. For example, let’s say a pixel of my sky is R229, G227, B222 (a slightly warm bright gray) and my magic wand tolerance is 15. The tool will select all pixels with a value in the range R(244-214) G(242-212) B(237-207)
The key is the selection
The magic wand tool is just one way to select an area. They key is to get the sky selected, not how it’s selected.
Copy the sky
Switch to the sky image. Press ctrl-a to select everything, then ctrl-c to copy.
Next switch back to the main image and make sure your ants are still on the march. Paste the sky into the selection with Edit -> Paste Into (shift-ctrl-v).
You will get a new layer and a mask.
You can position the sky by using the move tool (V). You can also stretch, shrink, or otherwise change the sky by transforming it. Press ctrl-t and drag the handles around to transform the sky. Skies can take an amazing amount of manipulation and still look good.
Fixing the halo
You may or may not get a halo around the edge. In the image above, the original is on the right; the image with the replaced sky is on the left. There are a couple of things to notice here. First the halo on the left is caused by the selection not being perfect, and the mask isn’t 100% right up to the statue edge. That’s allowing a pixel or so of the original sky to bleed through. (This shot is with both images enlarged to 1600%.) The other thing to notice is that no edge is always perfectly crisp at this level of zoom. Natural edges transition over 3 or 4 pixels.
If you have a halo, you need to fix it. Essentially what you have to do is refine the mask Photoshop created for you using the same techniques you always use to deal with the mask. What we’ll do is make the mask slightly smaller, allowing less of the background image to show through.
Zoom way in, use a very small brush and paint white on the mask along the edge.
Avoiding the problem
You may be able to avoid the problem by expanding your initial selection. After you click with the magic wand, use the menu to select Select -> Modify -> Expand and add one pixel to the selection.
Note that this isn’t always best. You may have some cleanup to do around the edges in the other direction. In this case, the edge of the torch is too sharp, and I need to use black on the mask with moderate opacity to smooth it out.
The best sky to replace isn’t a white sky, it’s a blue sky. Notice that when the edge selection isn’t quite right the halo comes not where there replacement has a cloud, but where blue is getting substituted on top of the original white. That original white shows up as a halo in the replacement blue sky. Where there is a nice white puffy cloud in the replacement sky, the white halo is still there but you can’t see it because it’s white on white and it looks natural. That means the best replacement of a totally white flat cloud sky is one with some blue but also a lot of clouds. It also means positioning the replacement sky clouds under your fine detail means less cleanup than positioning the blue replacement there.
Understanding Photoshop tools
If you’ve ever wondered what a tool or option does in Photoshop you’ve probably discovered that the Photoshop help file is totally useless. What the help system should have told you is in the Photoshop 6 Shop Manual by Donnie O’Quinn (ISBN 0-7357-1130-5). Alas it hasn’t been updated for later versions of Photoshop. Still, most of the tools you use and most of the options are unchanged from this version. For example, if you want to know how each blending mode works, or exactly what each option for the magic wand does, this book will tell you. It’s available used on Amazon from $9.49 to $39.99. There are 13 reviews, 12 five star, and 1 one star. The one star guy wasn’t arguing about the content, but bitching about the binding. I’d take it if it was loose sheets. As one reviewer said, Breathtakingly useful... an indispensable resource. There is really nothing else like it.


